This series of step-by-step articles was commissioned by Schaff Piano Supply for the purpose of featuring the tools and supplies that they have available for technicians, and also to help answer commonly asked questions about procedures. I enjoyed writing this series because I could include unlimited photos, whereas with my Journal articles, there was always a limit on both words and photos. With more freedom to go into detail, I felt I was able to give a fuller explanation for some of the protocols that I covered in the Journal, and was also able to write about procedures that I never had a chance to include in my "Small Shop" series. (One important note as far as ordering supplies is that Schaff Piano is a wholesaler that deals with technicians only. If you are a piano technician ordering from Schaff for the first time, you do need to set up an account in which you verify your professional standing.)  If you are a hobbyist, tools and supplies are available at several retail outlets listed on the internet. One such supply outlet to check into would be Vanda King.


Lacquer Stick Work
covers both basic and advanced use of a burn-in knife with lacquer sticks to repair small damage to case parts during the refinishing process. This article does not deal with lacquer stick repair of finished surfaces.


Installing the Music Desk Hinge article was a "by request" article that I wrote for Schaff when a particular customer could not for the life of him figure out how to install this style of desk hinge. Hopefully the information will be useful to at least one other technician at some point in time! Fun to write - took the request on a weekday afternoon and sent them the completed article the next morning.


Repinning the Upright Piano
 is a very complete look at the process of repinning an upright with oversize pins using a method of replacing two pins at a time to avoid taking all the tension off the piano to replace all the pins at the same time. This method makes the process of stabilizing the piano much easier, with less of a need for multiple follow-up tunings after the job is done. 


Removing the Bass Strings for Duplication is a useful guide for the person replacing their first set of bass strings. The article also shows an inside look at how bass strings are duplicated a Schaff Piano Supply for the customer.


Removing and Miking Treble Strings for Replacement is a very comprehensive guide to the process of removing treble string and sizing it so that a duplicate stringing scale may be installed. The article does not cover the procedure for recalculating a stringing schedule using modern computing methods, but is intended for the technician restoring a piano to strictly original specifications. 


Loading and Using 1 lb. Wire Canisters takes the worry about getting your new 1 lb. coil of wire from the bag it comes in to the canister without having the wire get away from you and end up in a tangled mess. Not something you want to have happen. Ever. 


Repinning and Restringing the Upright Piano, part 1 highlights the initial preparations that need to be taken before a repinning and restringing job might be completed. Directions are given for both repinning with oversize pins in the original pinblock and for installing factory size pins in new pinblock panels.


Repinning and Restringing the Upright Piano, part 2 goes into detail on the art of producing perfect coils with consistent becketts. For the technician who wants their efforts to be admired by other technicians, this article gives the needed details to a protocol which will produce perfect results.


Repinning and Restringing the Upright Piano, part 3 continues with instructions to finish off your restringing job with perfect coils and consistent becketts. 


Finishing the Cast Iron Plate highlights a low-tech method for refinishing the cast iron plate of a project piano using a spray product. Although other more intensive methods will produce more of a factory finish, this approach does a very nice job for the amount of time involved.


Duplicating and Replacing the Floating Pinblock, part 1 covers the procedures for the initial cutting out of a new pinblock from a block of pinblock material. This article emphasizes the procedure involved with reproducing the typical curved vintage grand pinblock, which can be complicated and a bit confusing the first time around. 


Duplicating and Replacing the Floating Pinblock, part 2 explains the process for doing the final cutting of a new pinblock and for the initial fitting of the pinblock to the plate. A solidly fitted pinblock can make a world of difference as to the stability of the tuning of the piano once new pins and strings have been installed.


Duplicating and Replacing the Floating Pinblock, part 3 describes the protocol for marking the pinblock for the pinholes and successfully drilling the pinblock on the drill press. Methods for reinstalling the cast iron plate with the pinblock attached back into the piano are also addressed.


Installing Tuning Pin Bushings compliments the above pinblock installation articles. Although the tools ane procedures for  replacing the tuning pin bushings are quite simple, there are several "tricks of the trade" which will make for a more professional job. 


Removing Keys and Keyframe of the Upright Piano is intended to be a guide for a person doing a restoration for the first time. Just knowing which screws to remove (and where those screws are often hidden is half the job in this important step to the disassembly of a piano.


Rebushing Keys explains an efficient method for removing old bushings, and a protocol for using metal cauls with hot animal hide glue for installation of the new bushings. 


Refelting the Keybed explains the process of removing old worn and moth-eaten felts and replacing with new front rail felts, balance rail felts and back rail cloth. 20 illustrated steps explain the protocol from beginning to end.


In-House Keytop Recovering is a 3 part article that covers the process from start to finish, and features protocols that anyone with woodworking tools and experience should be able to duplicate for keytops that will look "factory."


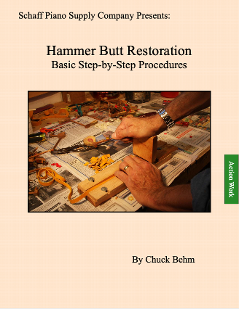
Invisible Ivory Keytop Replacement intends to show methods for saving and revising an original set of ivory keytops, when possible. The technician should always caution the owner about legal ramifications before undertaking this type of project. Moving a piano with genuine ivory over state lines may be problematic, for example. Also, the mere possession of replacement ivory keytops may be prohibited where the technician resides. However, when permitted, saving a beautiful set of ivory keytops can be a very rewarding service to provide.


Polishing Capstans explains the protocol for buffing capstans to a beautiful shine.


Installing Cork Bridle Straps in the Upright Action is helpful to the person undertaking this job for the first time. Just know how to push the cork into the catcher without breaking the catcher dowel makes the article worth the read. 


Regluing Loose Jack Flanges in the Upright Action explains a method for regluing a loose flange without removing the wippen from the action, greatly speeding up the process in that it can be done without removing the action from the piano.


Brass Rail Repairs covers the variety of repairs which often need to be done to an action with a brass rail. Learning to diagnose the symptoms and apply the correct solution are the focal point of the article.


Filing Hammers explains the protocol for filing hammers with a Dremel Tool. Although many technicians shy away from this method, with practice very good results can be achieved in a short amount of time. Knowing how to hold the Dremel,and how to use it with control makes all the difference.


Upright Hammer Replacement explains one set of protocols for replacing hammers which are too far gone for a simple hammer filing job. There are, of course, many differing sets of procedures for this particular repair, but this is a method which doesn't require expensive calibration equipment.


Hammer Butt Restoration is intended for the technician with more advanced skills and experience. Restoring hammer butts, as opposed to replacing them with new, takes time and patience, but is a valuable service to be able to offer to the customer who would like their piano to be restored as faithfully as possible to its original condition.


Replacing Hammer Butt Springs in the Upright Action explains the method for replacing broken or weakened butt springs with original factory style springs. Replacing the entire set of springs is the one way to make sure that weakened or breaking springs don't continue to cause problems down the road.


Splicing Broken Grand Hammer Shanks demonstrates a method for saving an original hammer shank by splicing in a new segment, which is necessary when the broken shank has a blunt end. When there is a long split it is of course easier just to glue the two halves back together, but with a blunt end a diagonal cut may be made to splice on a new segment. If done right it is an invisible and long-lasting repair.


Upright Pedal Mechanism Transformations explains the protocol for rejuvenating the pedal board when the customer tells you to "do it right." As opposed to a quick vacuuming and lubricating, this article covers tearing the mechanism apart to make this hidden portion of the piano look new again, which is actually very important to some piano owners. 


Using the Tuning Pin Crank, Basic Tips explains the use of a tool that looks simple, but is a bit confusing to people to figure out - until they see it done.


Using the Action Cradle gives tips for making effective use of the action cradle both in the shop and when moving an upright action from point A to point B. This article also explains how using the cradle makes working on an action simpler when it is on the bench.


The Piano Parts Trolley is a huge space saver in any shop where pianos are disassembled for refinishing or repaired. Instead of covering every bench and shelf with case parts, everything may be stored in one convenient location. Since building the first prototype for my shop, I have added two more to make it possible to work on multiple pianos at the same time without losing bench space.


Building the Collapsible Work Bench will provide a challenge the woodworker who enjoys a somewhat complicated project. A foldable bench that may be broken down and stored or moved may be just the thing that a technician with space limitations might be looking for.